As another sweltering summer ends, another TokyoR Meetup! With global warming in full swing and it still being around 30 degrees at the end of September, this month’s meetup was held at DIP Corporation, an personnel/recruitment services company, in their headquarters in Roppongi, Tokyo. This month’s session was another special-themed session involving Shiny apps!

In line with my previous round up posts:
I will be going over around half of all the talks. Hopefully, my efforts will help spread the vast knowledge of Japanese R users to the wider R community. Throughout I will also post helpful blog posts and links from other sources if you are interested in learning more about the topic of a certain talk. You can follow Tokyo.R by searching for the #TokyoR hashtag on Twitter.
Anyways…
Let’s get started!
BeginneR Session
As with every TokyoR meetup, we began with a set of beginner user focused talks:
Main Talks
hoxo_m: Asynchronous Programming for Shiny!
@hoxo_m of HOXO-M Inc. talked about asynchronous programming with
Shiny. Starting off with an introduction into the history of single and
multi-threading in both R and how the growing popularity of Shiny has
lead to a demand for multithreadedness to cater to the multitude of
users using a Shiny app at once!
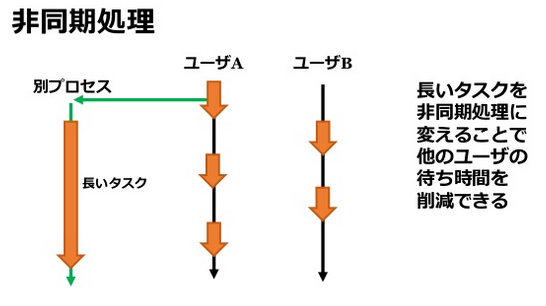
The main package that facilitates this in both R and Shiny is the {future} package which allows one to be able to evaluate R expressions asynchronously (in parallel or concurrently on a cluster). By using {future} in a Shiny context you can shift resource-intensive tasks (ex. grabbing data from an API) activated by one user into another process and free up time for other users’ tasks and reduce their waiting time.
The plan() function allows you to choose from a variety of options for
launching/attaching R processes. The choices are multisession,
multicore, and multiprocess. You can read more about it
here.
There’s not a whole lot you need to do to grab the results from another
process as all the render_*() are able to take “promise” objects. As a
reminder, a “promise” in this context is an object that takes a result
from an asynchronous process that happens later/slightly later. A
“promise” object takes the result from a {future} code result and it
will wait until a result appears from another process finishes running
the code.
Another important component of the asynchronous framework in R is the
{promises} package. It’s this package that allows for the actual
abstractions within your R code for asynchronous programming such as the
“promise pipe”, %...>%! You insert whatever long task code you have
into the future() function then use the “promise pipe” to pass it to
the rest of the code. As a future/promise object is not a data frame you
can’t pass filter() or other functions to it, so you have to pass the
“promise pipe” first before other regular functions can be run.
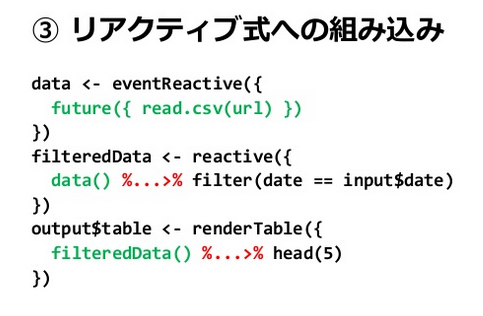
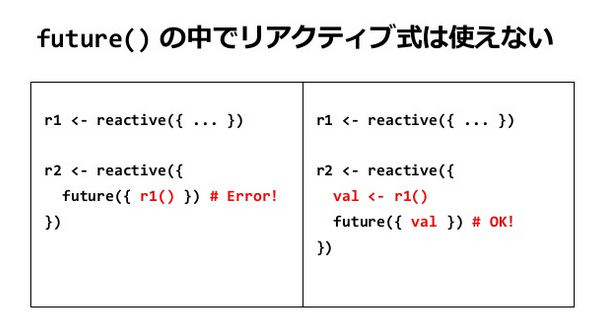
In a Shiny context, you can’t use reactives inside a future() function
so one needs to assign a reactive as an object before the future()
code and then pass that object into the function.
.PNG)
You also need to carefully think about WHERE (as in which process) the code is running. For example in the code below, the results are the same in both the top and bottom code. The code in black is done by the main process while the code in green is done by another process.
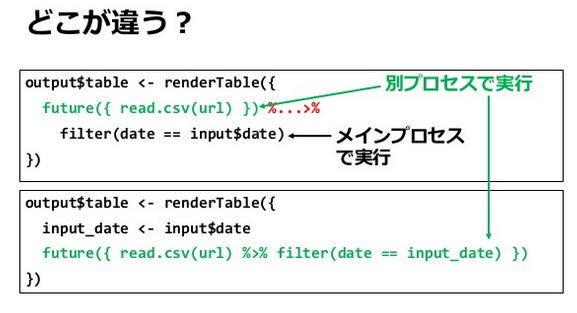
Although the above code works in both cases, for some functions such as
plot() and print() can be run in another process and but their
output can not be returned by the main process. The solution is to
use the “promise pipe” to make sure that plot()/print() is being run
by the main process instead. On the other hand you can still use
promises within observe*() and eventReactive*()/reactive() code,
you just have to remember to use the “promise pipes”.
Np_Ur: A Simple Shiny App in 30 Minutes!
@Np_Ur is known in the Japan community for his love of {shiny}, he
even wrote a book on it called “Building Web Applications in R with
Shiny”. This presentation was largely a demonstration as @Np_Ur
explained, from the ground up, a lot of the basic functions that can get
you a working Shiny app in the space of 30 minutes! From creating a
navigation bar via navbarPage() to creating different drop-down
options for customizing a plot and talking about extra functionality
from other packages such as {DT} and {shinycssloaders}, @Np_Ur took us
through the code and showed us completed Shiny apps for each step of the
way.
I recommend going through his slides (also hosted on Shiny) as well as checking out the code for each of the Shiny apps he made for all different functionalities he talked about by clicking on the link below!
kashitan: Making {shiny} Maps with {leaflet}!
@kashitan presented some tips (that you normally won’t see in
books/articles) for using {leaflet} with Shiny for map applications! He
took us through four different functions that he found very useful for
making {leaflet} maps with Japan census data.
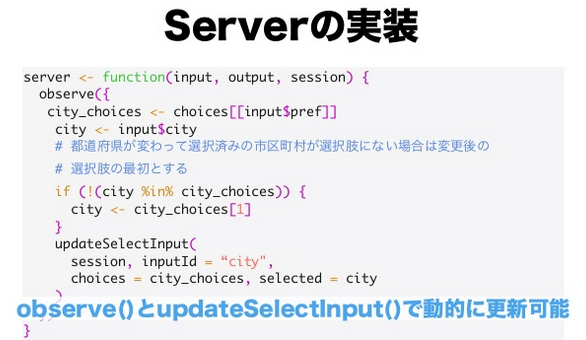
The first function: updateSelectInput() allows you to update a
drop-down menu with new values after selecting a certain input. In
@kashitan’s case using the Japan census Shiny app, he wanted to be
able to update the choices of the city/district after choosing a
different prefecture on the app. Using the updateSelectInput()
function the list of choices from the drop down menu updates to the
city/districts of the newly chosen prefecture!
You can check out the documentation here.
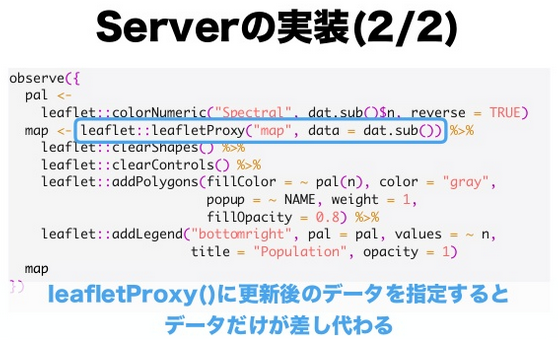
The second function: leafletProxy() allows you to customize a
{leaflet} map even after it has been rendered by Shiny. For @kashitan
this was necessary as he didn’t want the map’s active zoom level and
center coordinates to change even after choosing a new prefecture to
look at.
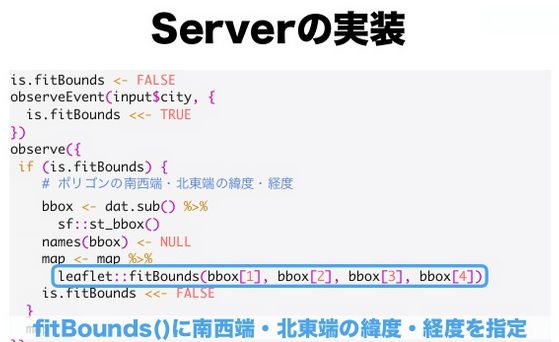
The third function: fitBounds() allows you to set the boundaries of
the map. For @kashitan similar to the previous function shown, he
wanted the bounds to the view, following a change in the city/district,
to always be within a certain bounding box.
The last function: input${id}shape_click shows you information about
the polygon shape of the map you just clicked. {leaflet}’s “click” event
currently only shows you the coordinate and id values from this
function.

okiyuki: Software Engineering for Shiny!
@okiyuki presented on the various R packages used for the software
engineering that supports Shiny apps.
- {memoise}: Caches data when certain function is run for the first time (useful for dashboard shiny apps where similar use cases can be predicted)
- {pool}: Easy database connection management in an interactive context. After inserting/accessing SQL database connection info, the connection is closed when app itself closes!
- {shinyProxy}: Deploy Shiny apps with LDAP authentication/authorization and TLS protocols for an enterprise context. It uses Docker so that each user is using the app in their own single Docker container.
- {shinyloadtest}: Helps analyze load tests and Shiny app performance with multiple users.

@okiyuki also talked about some of his personal struggles and pitfalls
that he has come across when building Shiny apps at work. These include:
- Deployed on ShinyServer but there was an error! Even though it was
working fine a minute ago!
- Solution: Use {Shinytest} and {testthat} to test deployment and other actions in Shiny
- Unknowingly/unintentionally using functions from a different
namespace
- Solution: Make sure to explicitly
::your functions - Also restart your app via altering
restart.txtin your Shiny app directory
- Solution: Make sure to explicitly
An extra section talked about various helpful packages for Shiny app aesthetics such as:
- {shinycssloaders}:
- {shinyace}:
- dreamRs’ suite of Shiny packages such as {shinyWidgets}
- I introduced some of dreamRs’ packages in my useR!2019 blog post here.
- Various packages to create Shiny Templates: {bs4dash}, {shinymaterial}, {fullpage}, {shiny.semantic}
LTs
igjit: Edit Your Photos with {shinyroom}!
You might remember from a few months back, @igjit presented on “RAW
image processing with R” (TokyoR
#79).
Continuing where he left off he decided to create a photo-editing UI
using the power of {shiny}. Motivated by comments following the previous
presentation, @igjit decided to base it on “Adobe Lightroom”, and call
it the {shinyroom} package. You can take a look at it
here.
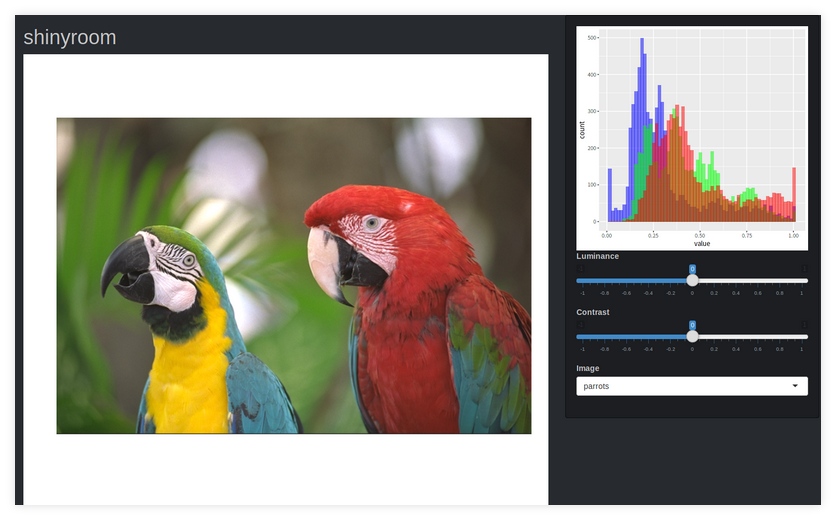
In terms of actually building the Shiny app he used the {imager} package
for the actual photo editing functionality while {golem} was used as the
package framework for the app. For appearances @igjit used the
{shinythemes} package
During the course of building the app, @igjit came across a peculiar
problem concerning the screen when the Shiny app was busy. By default, a
particular panel becomes slightly opaque when the server is busy doing
stuff in the background but this is annoying when you are working on
editing images. To get around this problem, @igjit created another
package called {shinyloadermessage} so that instead of the screen
graying out a small message will appear instead.
- Building Big Shiny Apps - A Workflow (Colin Fay, Vincent Guyader, Cervan Girard, Sebastien Rochette)
- {shinyloadermessage}: Loader messages for Shiny outputs
- {shinybusy}: For minimal busy indicator in Shiny apps
flaty13: Reproducible Shiny with {shinymeta}!
@flaty13 talked about the recently made public {shinymeta} package and
reproducibility with Shiny apps. This is a topic that has taken a while
to develop due to the complexity of the issue, where the end goal was to
find a way to document and describe the actions of users who interacted
with very dynamic Shiny apps with many different features. With the
{shinymeta} package you can now download R scripts highlight the steps
you took in interacting with the app.
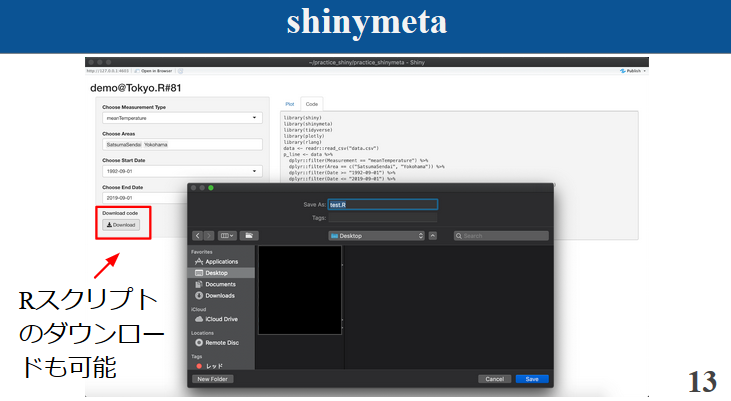
The next step that is currently in development is to output an .RMD
report among a number of other features as the package is still in the
experimental phase. See the resources below for more details, especially
Joe Cheng’s keynote for all the stuff under-the-hood that’s making this
exciting new development possible!
- {shinymeta} Github page
- Summary of {shinymeta} from useR!2019 blog post
- “Shiny’s Holy Grail: Interactivity with Reproducibility”: Joe Cheng’s useR!2019 Keynote
Other talks
- y__mattu: Finding info about my favorite band
- Ikeda: A jack-of-all-trades statistic app for intra-company use!
- kos59125: Interactive Presentation with Shiny
- ao: A Shiny app for pharmacokinetic simulations
Food, Drinks, and Conclusion
TokyoR happens almost monthly and it’s a great way to mingle with
Japanese R users as it’s the largest regular meetup here in Japan. The
next meetup will be on October
26 and I will also be one of
the presenters!
Talks in English are also welcome so if you’re ever in Tokyo come join us!